Coding Agents and IDEs
Overview
Coding agents are AI‑driven assistants that can turn natural‑language prompts, comments, or partial snippets into fully‑formed, context‑aware code and can be run via a terminal, embedded directly inside an IDE or editor. They can also perform tasks such as autocompleting a line, generating whole functions, writing unit tests, debugging and running code—all by querying a large language model (LLM) behind the scenes. ARC’s hosted LLMs are compatible with many modern IDEs and AI coding agents that support OpenAI-compatible APIs. There are many IDEs available, and their AI integration features evolve frequently. ARC focuses on providing guidance specific to connecting to ARC resources. In general, connecting an IDE-based AI assistant (coding agent) to ARC’s LLM service follows this process:
Install and enable the IDE’s AI or LLM integration plugin (extension)
Obtain an ARC API key from https://llm-api.arc.vt.edu
Configure the AI assistant (coding agent) to use an OpenAI-compatible endpoint
API URL:
https://llm-api.arc.vt.edu/api/v1/chat/completionsProvide your private ARC API key
Select the appropriate ARC-hosted model (e.g.,
gpt-oss-120b,DeepSeek-V4.1-Flash,GLM-5.3)Configure model capabilities (tool calling, vision, thinking) if supported
Set token limits as appropriate for the model (e.g., a
131072-token context window, with16384reserved for output)
You can use some of the most widely used coding agents with ARC’s hosted LLMs by pointing them to ARC’s API endpoint. On this page, we provide instructions to connect OpenCode, Claude Code, VS Code, and IntelliJ IDEA to ARC’s LLMs.
Note
These instructions use ARC’s shared API at https://llm-api.arc.vt.edu. You can also connect to a dedicated LLM session via Open OnDemand by using that session’s base URL and API key instead.
Caution
Be very careful letting AI agents run commands on their own if you are connecting to ARC. Do not approve commands that are potentially destructive, could access data owned by other users, or could otherwise be harmful to our systems.
Recommended agent settings
These settings help an agent get good performance from the shared service:
Prefer
DeepSeek-V4.1-Flashfor agents. It is optimized for speed and long-context work, with a 1M-token context window, which suits agent sessions that send many requests and build up large histories. UseGLM-5.3when a task needs its stronger reasoning.Keep the start of the conversation stable. The service reuses the cached beginning of your conversation from one turn to the next. Cached input is served much faster and counts far less against your fair share. Don’t put content that changes on every turn (timestamps, git status) in the system prompt, and turn off features that trim or rewrite old tool output mid-session. For example, keep OpenCode’s
compaction.pruneat its default offalse.Compact rarely, and before the context is full. Each compaction rewrites the history, so the next turn has to process the whole prompt again from scratch. Set the context window to the model’s real limit (
1048576forDeepSeek-V4.1-Flash,131072forGLM-5.3) so the agent compacts before a request fails.Reserve 8k–16k tokens for output, not the maximum. A larger output limit leaves less room for input. On fair-queued models, the unused part of a running request’s output limit also counts against your place in line at busy times.
Raise the client timeout to 30 minutes, the server’s own limit. At busy times, requests from agents wait behind interactive chat, and a long new prompt can wait a minute or two before its first token arrives. Some agents count the whole response against their timeout; OpenCode’s default of 5 minutes cuts off long answers mid-stream.
Keep parallel requests within your limit. Subagents and parallel tool calls are fine, but keep the total number of requests in flight within the limit on the usage limits page. Let the agent retry HTTP 429 errors with backoff. Don’t retry HTTP 413 errors; they mean the request is too large.
Keep streaming enabled. Non-streaming requests are limited to 8,000 output tokens.
If you use GLM for an agent, choose
GLM-5.3-thinking-high. The defaultGLM-5.3runs at maximum reasoning effort and can think for a very long time before it answers. That makes sense for a single hard question, but an agent makes many requests in a row, so the delay adds up, and all that reasoning counts against your fair share at busy times.GLM-5.3-thinking-highreasons athigheffort and is the better GLM choice for agent sessions. Switch toGLM-5.3for an individual task that needs the extra reasoning.
OpenCode
OpenCode is an open source agent that helps you write code in your terminal, IDE, or desktop. You can use OpenCode on your local machine and then connect to ARC’s LLMs with the following workflow.
First, install OpenCode by following OpenCode’s official install instructions for your platform — there are several install methods (curl, npm, Homebrew, and others). On Windows, OpenCode recommends installing and running it inside WSL for the best experience.
Next, add ARC as a provider in your OpenCode config. OpenCode reads a global config file at ~/.config/opencode/opencode.json on macOS and Linux (and on Windows under WSL).
If you do not already have a config file, create one with the contents below. If you already use OpenCode, you only need to merge the provider block (the ARC entry) into your existing config — and optionally set "model" — leaving the rest of your configuration untouched.
{
  "$schema": "https://opencode.ai/config.json",
  "provider": {
    "ARC": {
      "name": "ARC",
      "npm": "@ai-sdk/openai-compatible",
      "options": {
        "baseURL": "https://llm-api.arc.vt.edu/api/v1",
        "apiKey": "sk-XXXXXXXXXXXXXXXXXX",
        "timeout": 1800000,
        "headerTimeout": 1800000
      },
      "models": {
        "gpt-oss-120b": { "name": "gpt-oss-120b", "limit": { "context": 131072, "output": 16384 } },
        "DeepSeek-V4.1-Flash": { "name": "DeepSeek-V4.1-Flash", "limit": { "context": 1048576, "output": 16384 } },
        "GLM-5.3": { "name": "GLM-5.3", "limit": { "context": 131072, "output": 16384 } },
        "GLM-5.3-thinking-high": { "name": "GLM-5.3-thinking-high", "limit": { "context": 131072, "output": 16384 } }
      }
    }
  },
  "model": "ARC/DeepSeek-V4.1-Flash"
}
Replace apiKey with your personal ARC API key and set "model" to your preferred default. Then run opencode to start.
Note
The model lists above show the primary model variants. Additional variants are listed on the ARC LLM API models page. They have been omitted here for brevity, but they follow the same configuration pattern.
Claude Code
Claude Code is an AI-powered coding assistant that can read your codebase, edit files, run commands, fix bugs, and automate development tasks. Both the Terminal CLI and VS Code extension versions can be used to connect to ARC’s LLMs.
Caution
Claude Code is built and tuned for Anthropic’s own models, and it is not an ideal client for ARC’s hosted models. Several features will be unavailable or unreliable when pointed at a custom endpoint, including web search, sub-agents, extended thinking, and prompt caching. It also assumes a 200,000-token context window for unrecognized models, so on ARC’s 131,072-token models a large prompt can exceed the real limit and fail mid-session with a maximum context length exceeded error and you will need to compact or clear the context manually. If you still want to use Claude Code, the configuration below sets a conservative output reservation to reduce (but not eliminate) context-overflow errors.
First, install the Claude Code CLI on your local system:
macOS / Linux / WSL:
curl -fsSL https://claude.ai/install.sh | bash
Windows (PowerShell):
irm https://claude.ai/install.ps1 | iex
Then you may connect your local Claude Code agent to ARC’s LLMs through the Open WebUI proxy by running the following:
export ANTHROPIC_BASE_URL="https://llm-api.arc.vt.edu/api/"
export ANTHROPIC_API_KEY="YOUR_OPEN_WEBUI_API_KEY"
export CLAUDE_CODE_MAX_OUTPUT_TOKENS=8192
export API_TIMEOUT_MS=600000
claude --model DeepSeek-V4.1-Flash
Note
Put standing instructions and goals in a CLAUDE.md or AGENTS.md file, not in --append-system-prompt. With ARC’s API, the model currently does not see text added through that flag. Instructions in CLAUDE.md or AGENTS.md do reach the model, and Claude Code loads them again after it compacts the conversation, so goals kept there are not lost to compaction. Use the CLAUDE.md in your project directory for goals that apply to one project, or ~/.claude/CLAUDE.md for goals that apply everywhere. Run /memory in Claude Code to see which files are loaded.
Now to interact with your directories on the cluster - follow the steps in this next section
Interacting with ARC clusters via SSH
Claude Code can interact with your directories and ARC’s cluster resources like checking your jobs, staging files, or interacting with slurm, issuing SSH commands from your local CLI.
Claude Code (runs on your local system)
  → model inference via ARC's LLM API gateway (llm-api.arc.vt.edu)
  → cluster and slurm commands via SSH to the login node
Setting this up is very easy, just follow these 4 steps:
Step 1 — Set up SSH key authentication
Claude Code issues its own SSH commands independently of your terminal.
SSH keys with ssh-agent let you authenticate once per session — all subsequent calls, including those Claude issues, proceed silently.
Make sure you have this set up Setting up and using SSH Keys and ssh-agent
Update your ssh config on your local system nano ~/.ssh/config, so you won’t need to approve Duo requests for each prompt, see the sample below:
Host owl3
    HostName owl3.arc.vt.edu
    User YOUR_VT_PID
    AddKeysToAgent yes
    IdentityFile ~/.ssh/id_rsa
Now verify the connection works:
ssh owl3.arc.vt.edu 'hostname; whoami; pwd'
Step 2 — Create a project folder and download CLAUDE.md
On your local system, you will need to create a directory and the claude.md file, Claude Code reads the CLAUDE.md from the directory at startup to guide its behaviour — context limits, unavailable proxy features, SSH approval rules, and HPC expectations.
mkdir -p ~/arc-claude-project && cd ~/arc-claude-project
curl -o CLAUDE.md https://raw.githubusercontent.com/AdvancedResearchComputing/examples/staging/LLM/claude-code/CLAUDE.md
Full file: CLAUDE.md
Step 3 — Start Claude Code
cd ~/arc-claude-project
claude --model DeepSeek-V4.1-Flash
Note
Keep approval gating on for your first few sessions. Once you trust the read-only commands (pwd, squeue, quota, ls), you can allow those without asking. Always require approval for job submissions and write commands.
Step 4 — Test the setup
Caution
Yes, another caution: always review commands before approving them. Don’t approve commands you’re not sure about, or that might access data owned by other users may be in the same project directory you have access to, that could write changes to shared files. We recommend mostly using read-only prompts or working on new personally owned files.
Run these sample prompts to test your Claude Code is working with the cluster:
What to test |
Prompt |
|---|---|
Cluster identity |
|
Storage quota |
|
Running jobs |
|
Then you can type /exit or Ctrl+C to exit your claude agent, and get back to the regular terminal.
Visual Studio Code
Visual Studio Code provides a built-in Chat/Agent view that supports language models from multiple providers, including custom endpoints. You can bring your own language model API key (BYOK) from ARC to use ARC-hosted LLMs directly in VS Code Chat without a GitHub Copilot plan.
You may use your https://llm-api.arc.vt.edu API key to connect VS Code Chat with ARC’s hosted LLMs.
The following instructions are based on VS Code’s language models documentation.
Note
Some features in VS Code still require a GitHub Copilot subscription: semantic search, inline suggestions (code completions), and features that rely on embeddings.
Add a custom endpoint model
The Custom Endpoint provider lets you connect any compatible API endpoint to chat in VS Code. It supports three API types: Chat Completions, Responses, and Messages. For ARC’s hosted LLMs, use the Messages API type.
To add an ARC-hosted model with the Custom Endpoint provider:
Run the Chat: Manage Language Models command from the Command Palette (open it with
Ctrl+Shift+Pon Windows/Linux orCmd+Shift+Pon macOS).Select Add Models, and then select Custom Endpoint from the list.
Enter a group name for the models, for example
ARC. This is the grouping label shown in the model picker and Language Models editor.Enter your ARC API key. VS Code writes this to the JSON file automatically as an editor secret which looks like
"${input:chat.lm.secret.xxxxxxx}".Select the API type: Messages.
VS Code opens a
chatLanguageModels.jsonfile where you can configure the model details. TheapiKeyis written by VS Code automatically based on the key you entered earlier. The only part you need to edit is themodelsarray. The following example configures four ARC-hosted models (GLM-5.3,gpt-oss-120b):[ { "name": "ARC", "vendor": "customendpoint", "apiKey": "${input:chat.lm.secret.xxxxxxx}", "apiType": "messages", // only modify this models array "models": [ { "id": "gpt-oss-120b", "name": "gpt-oss-120b", "url": "https://llm-api.arc.vt.edu/api/", "toolCalling": true, "vision": false, "maxInputTokens": 131072, "maxOutputTokens": 16384 }, { "id": "DeepSeek-V4.1-Flash", "name": "DeepSeek-V4.1-Flash", "url": "https://llm-api.arc.vt.edu/api/", "toolCalling": true, "vision": true, "maxInputTokens": 1048576, "maxOutputTokens": 16384 }, { "id": "GLM-5.3", "name": "GLM-5.3", "url": "https://llm-api.arc.vt.edu/api/", "toolCalling": true, "vision": true, "maxInputTokens": 131072, "maxOutputTokens": 16384 } ] } ]
IntelliJ IDEA
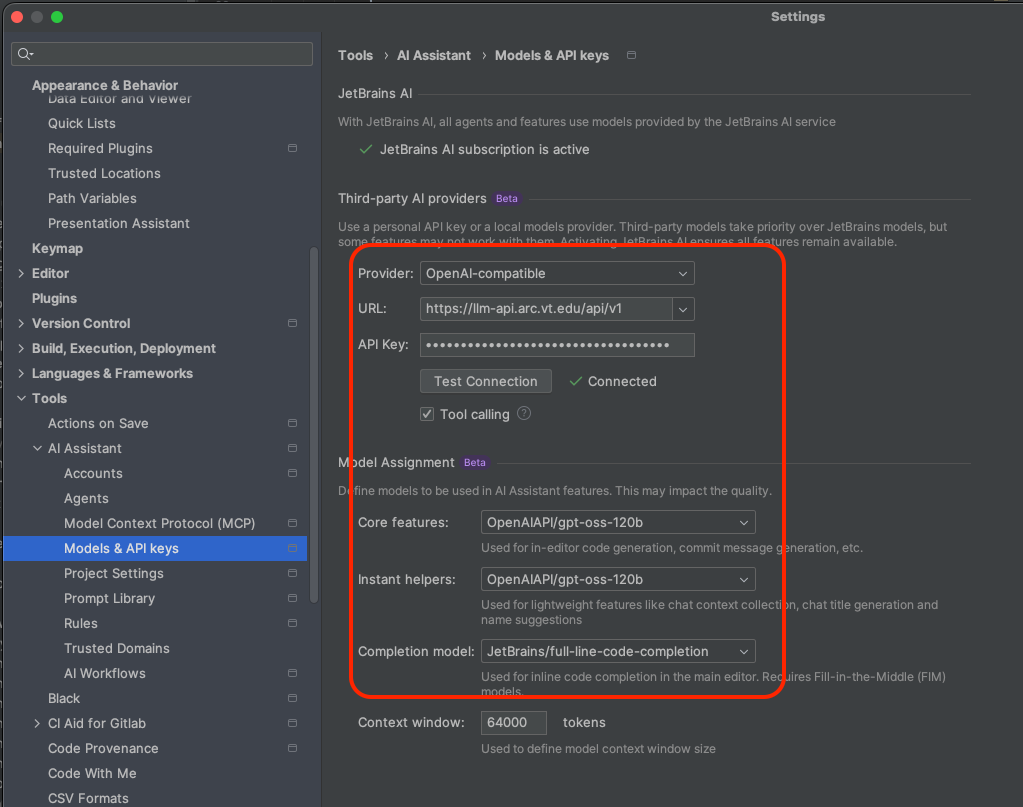
Make sure IntelliJ is up to date (v.2025.3.2 or newer) and activate the native AI Plugin
Set the AI assistant plugin as follows
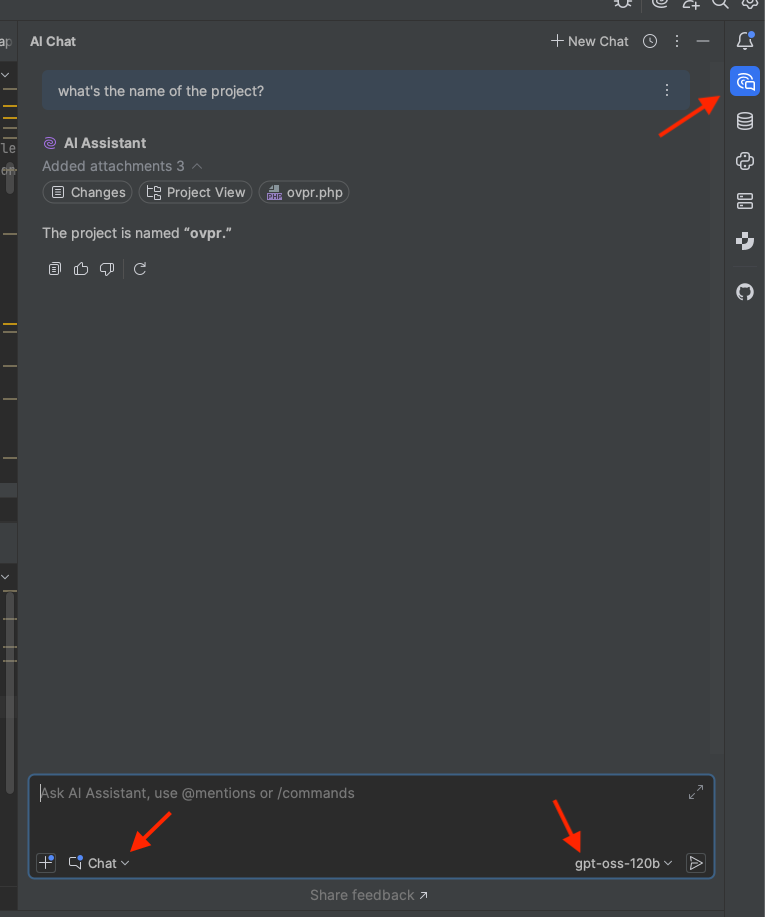
Activate the AI chat interface and enter your prompts